8. Data Propagation
MQC offers a feature to propagate data, which is missing at a certain revision, by using data previously imported instead of importing the data again.
8.1. Motivation
Each piece of data imported into MQC is assigned to a revision depending on the point in time the data was collected, i.e. the report has been created. If this data is not re-imported, MQC treats it as missing for all other revisions.
As long as imported data stays valid and to reduce the amount of missing data, the user may decide to propagate the data, which means to re-use this data in later revisions, too.
With that, MQC is able to calculate and visualize certain quality metrics even for those revisions, where the data used to calculate the particular quality metric has not been re-collected respectively re-imported.
Note
Data may become invalid, if for instance the artifact changes (new model version), but the data is not re-collected.
Therefore the user must decide carefully if and which data to propagate.
In any case, data is replaced if more up-to-date data - new data collected for the same object - is loaded into MQC.
8.2. How to Propagate Data?
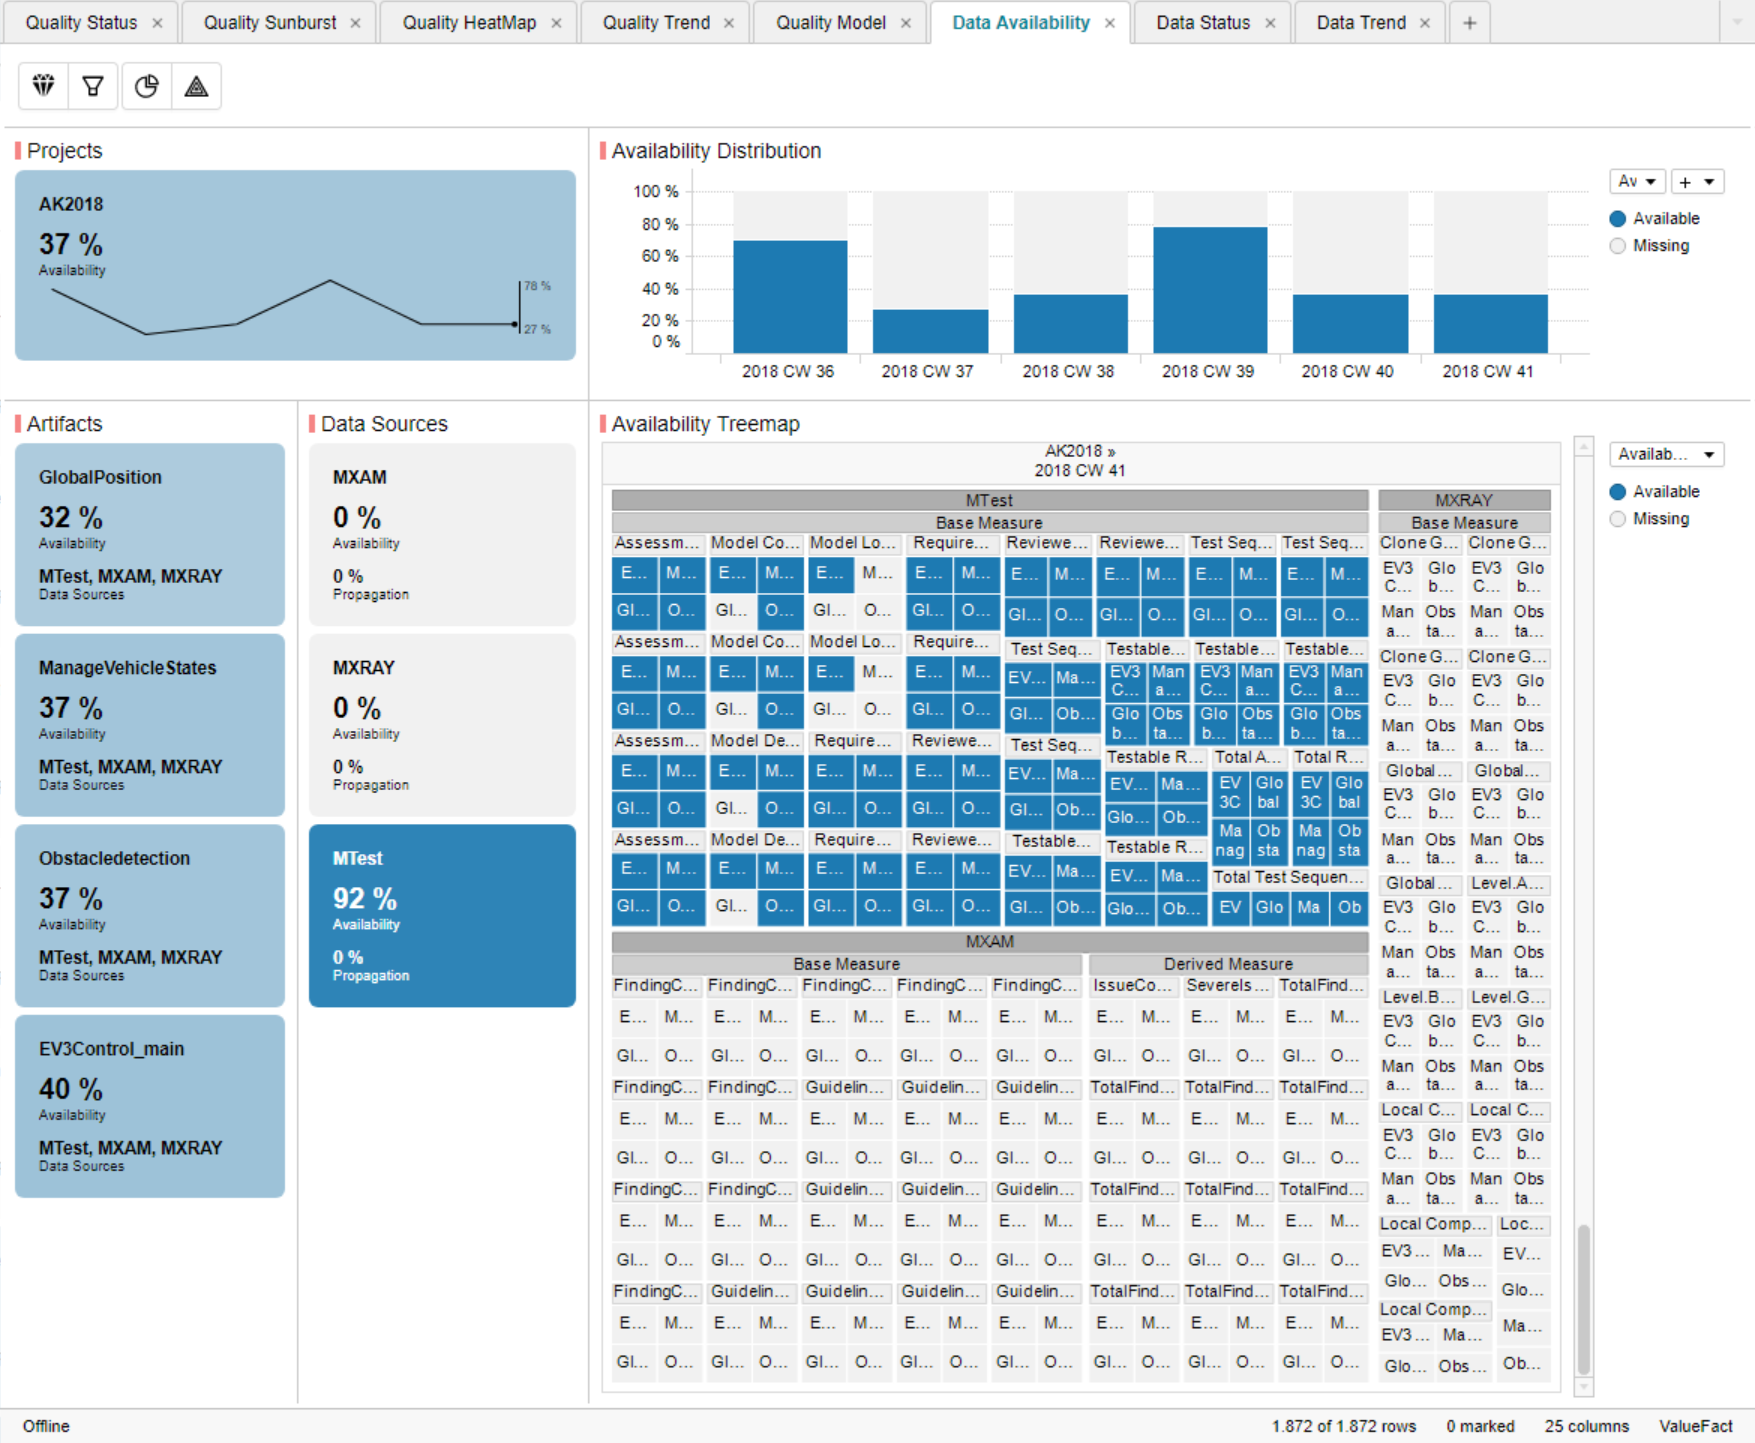
Figure 8.1 Data Availability after Import before Propagation was triggered
Figure 8.1 shows the availability status of the data currently loaded into MQC. Available data is colored blue, missing data is colored grey. The availability index inside the Project KPI shows an availability of only 37 % (for the most recent revision, i.e. CW 41).
To trigger the MQC propagation feature, the user must select the data that has to be propagated. The easiest way to do that is to mark the Project KPI tile. This selects all data, means all base and derived measures from all data sources regardless if data is available for a certain artifact and/or revision or not.
After marking, right click on the Project KPI tile and choose from the context menu.
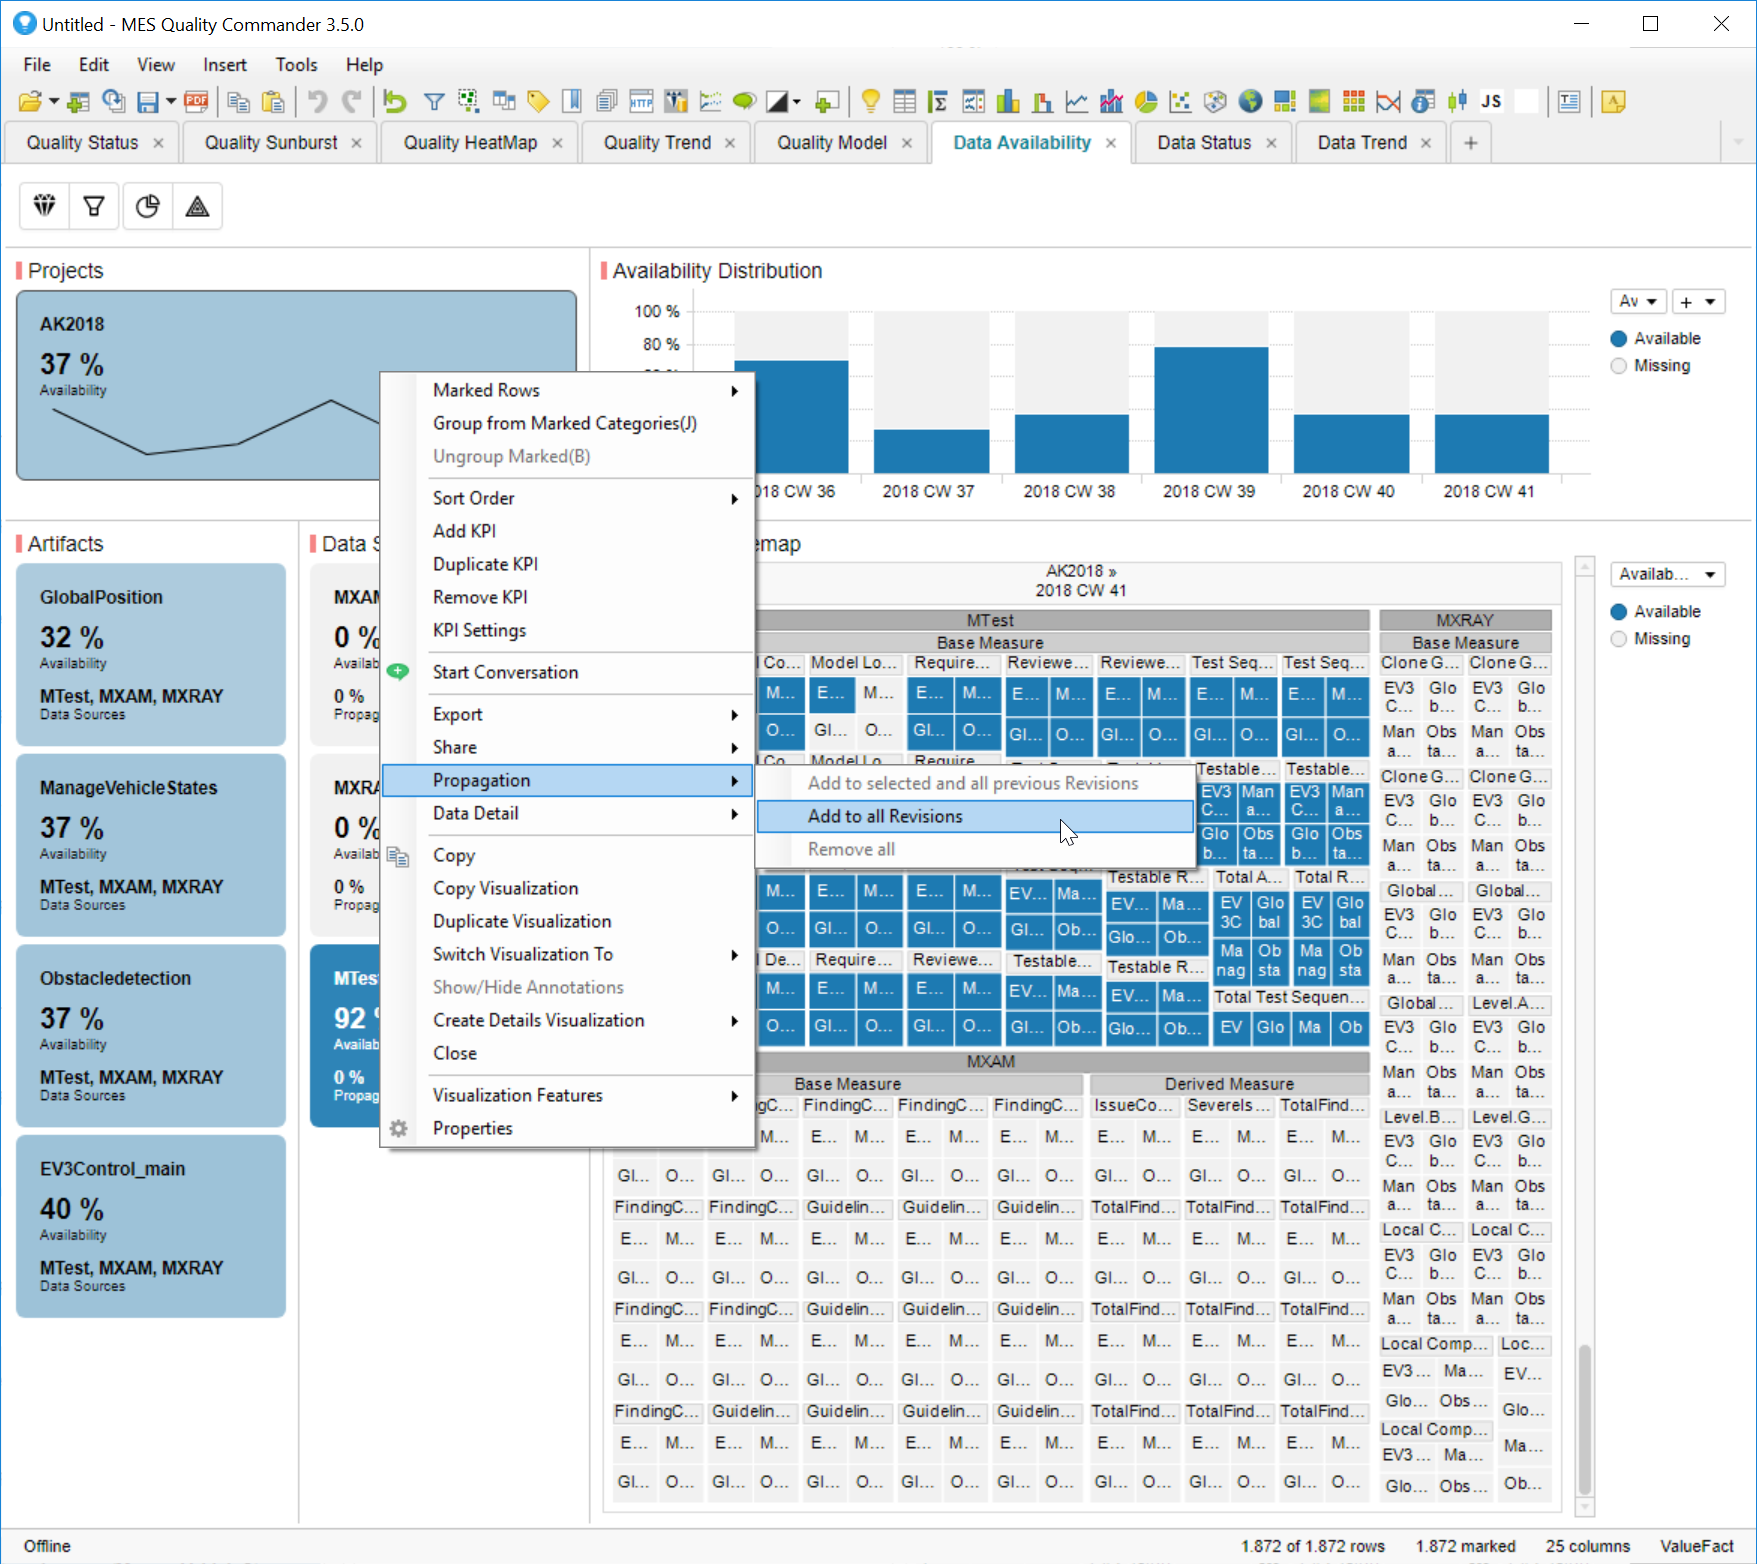
Figure 8.2 Trigger Data Propagation via Context Menu Entry
There are three options:
Add to selected and all previous Revisions (see Section Propagate Data to Selected Revisions)
Add to all Revisions (see Section Propagate Data to all Revisions)
Remove all (see Section Remove Propagated Data)
Choose . Starting with the first revision, for each revision the availability of the data is checked. If data is missing, it is taken from the previous revision if present there (could be either loaded data or again data that was propagated from the revision before).
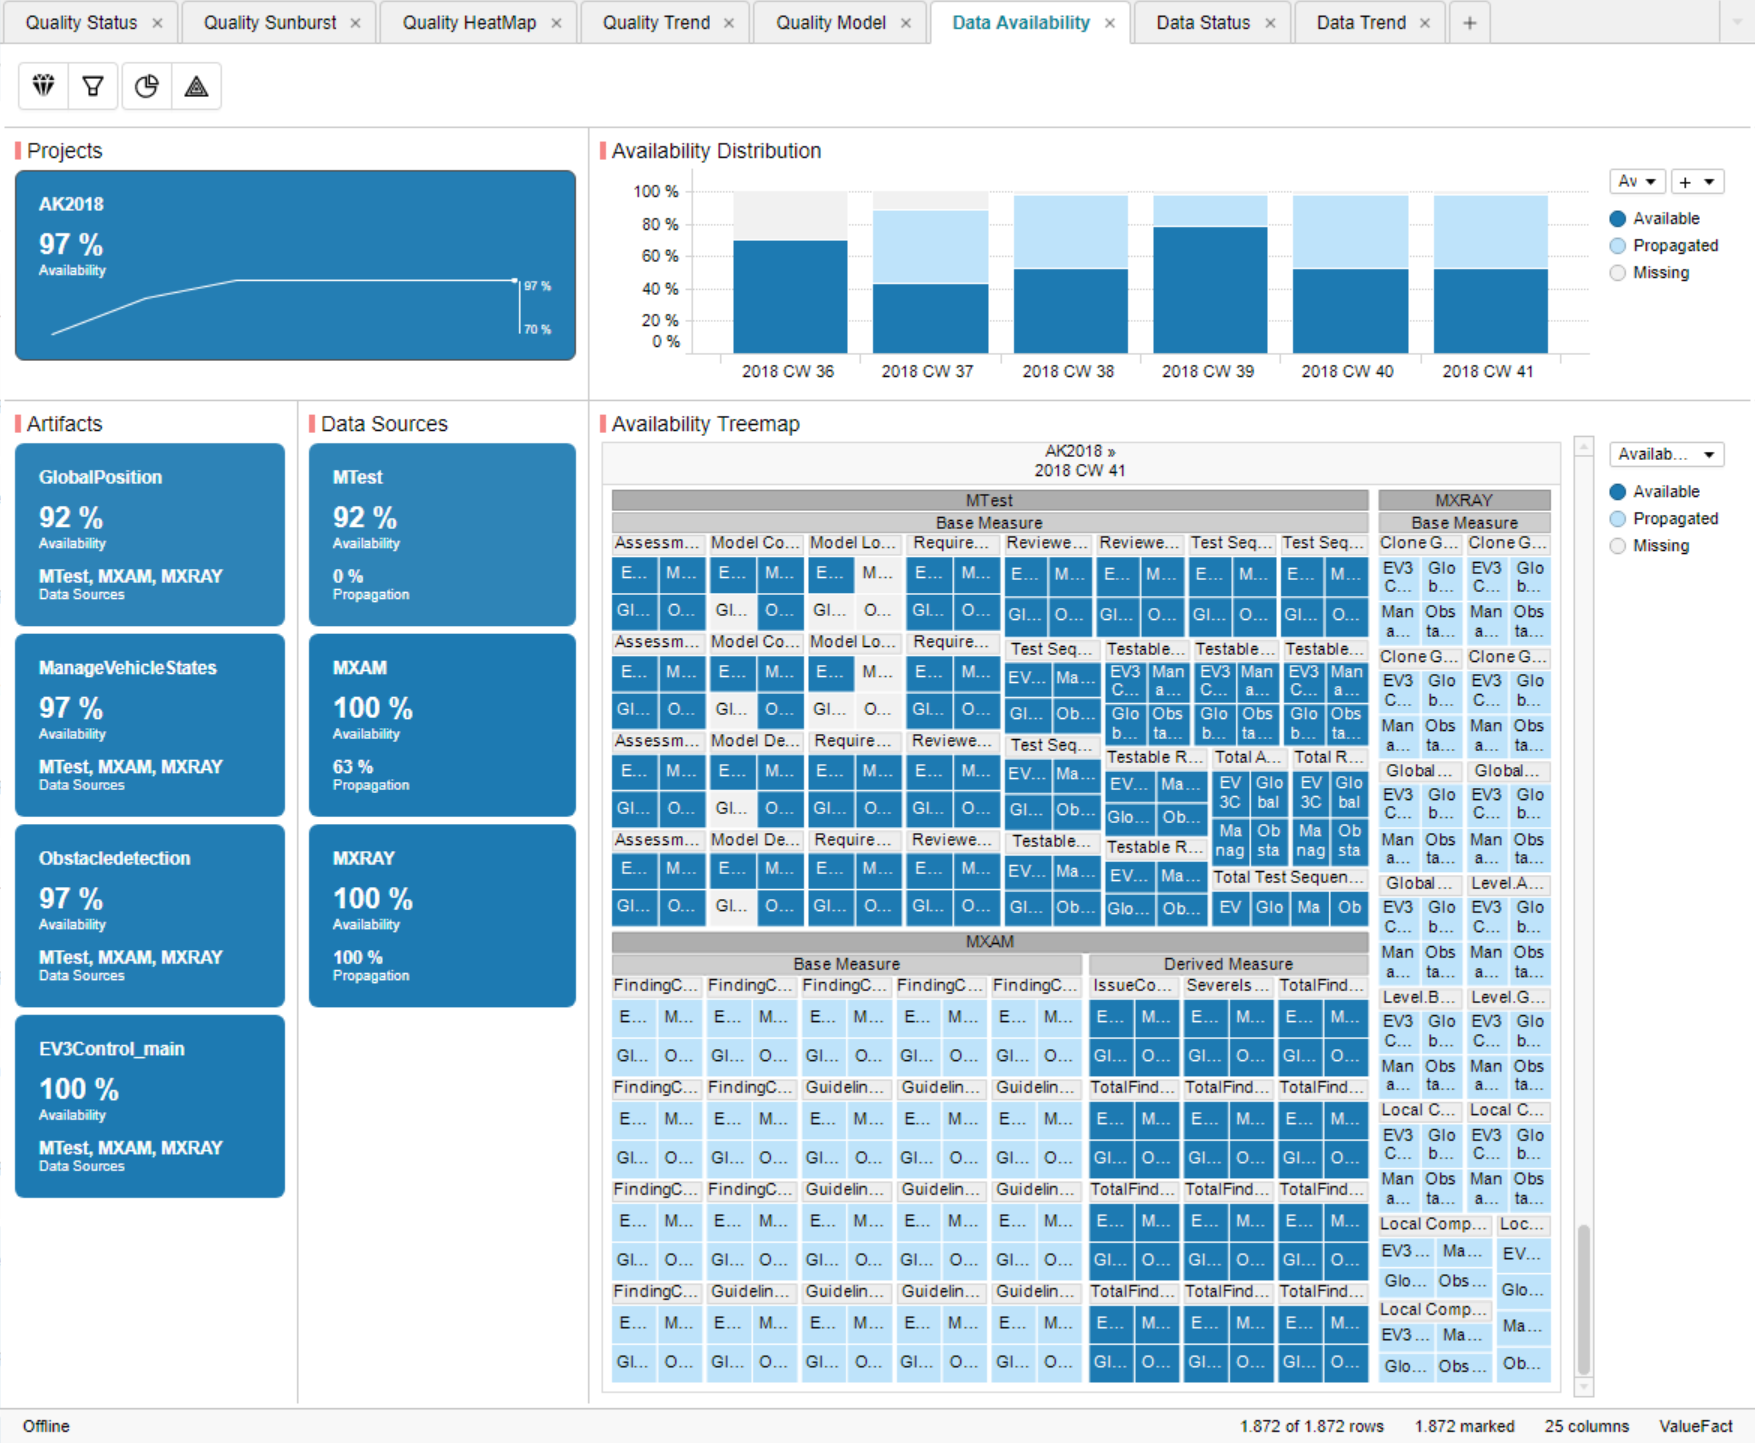
Figure 8.3 Data Availability after Propagation
Figure 8.3 shows the availability status after Propagation has been triggered. Propagated data is colored light blue to distinguish between imported and propagated data. Please note that the availability index inside the Project KPI now has been increased to an availability of 97 % and the distribution chart as well as the availability treemap are now showing blocks of propgated data instead of missing data.
Note
Data to be propagated ist identified by the measure name and by the name of the artifact. In case of the artifact name has been changed, i.e. via a proper artifact mapping by importing project structures (see Configuration of Project Structures), the propagation have to be retriggered for the new artifact names.
8.3. Data Selection for Propagation
As mentioned in the previous section, propagation works on the data selected by the user.
All data is selected:
when marking the Project KPI tile
when marking a whole revision inside the Availability Distribution bar chart (missing data bin as well as available data bin)
Besides it is also supported to trigger propagation for a limited set of data only. With that, the user may restrict propagation on data, which is missing in a certain revision.
Particular data is selected:
when marking a particular bin inside the Availability Distribution bar chart (e.g. missing data bin only)

Figure 8.4 Missing Data Bins in Availability Distribution Bar Chart
The amount of data to be propagated then depends on the selected data bin. For example selecting the missing data of revision CW 39 in Figure 8.4, leads to another result (less propagated data) than selecting the missing data of revision CW 40.
8.4. Propagate Data to Selected Revisions
Select data as described in Data Selection for Propagation, then right click on selection and choose .
This fills all revisions up to the selected revision. Data will not be propagated to revisions later than the selected one.
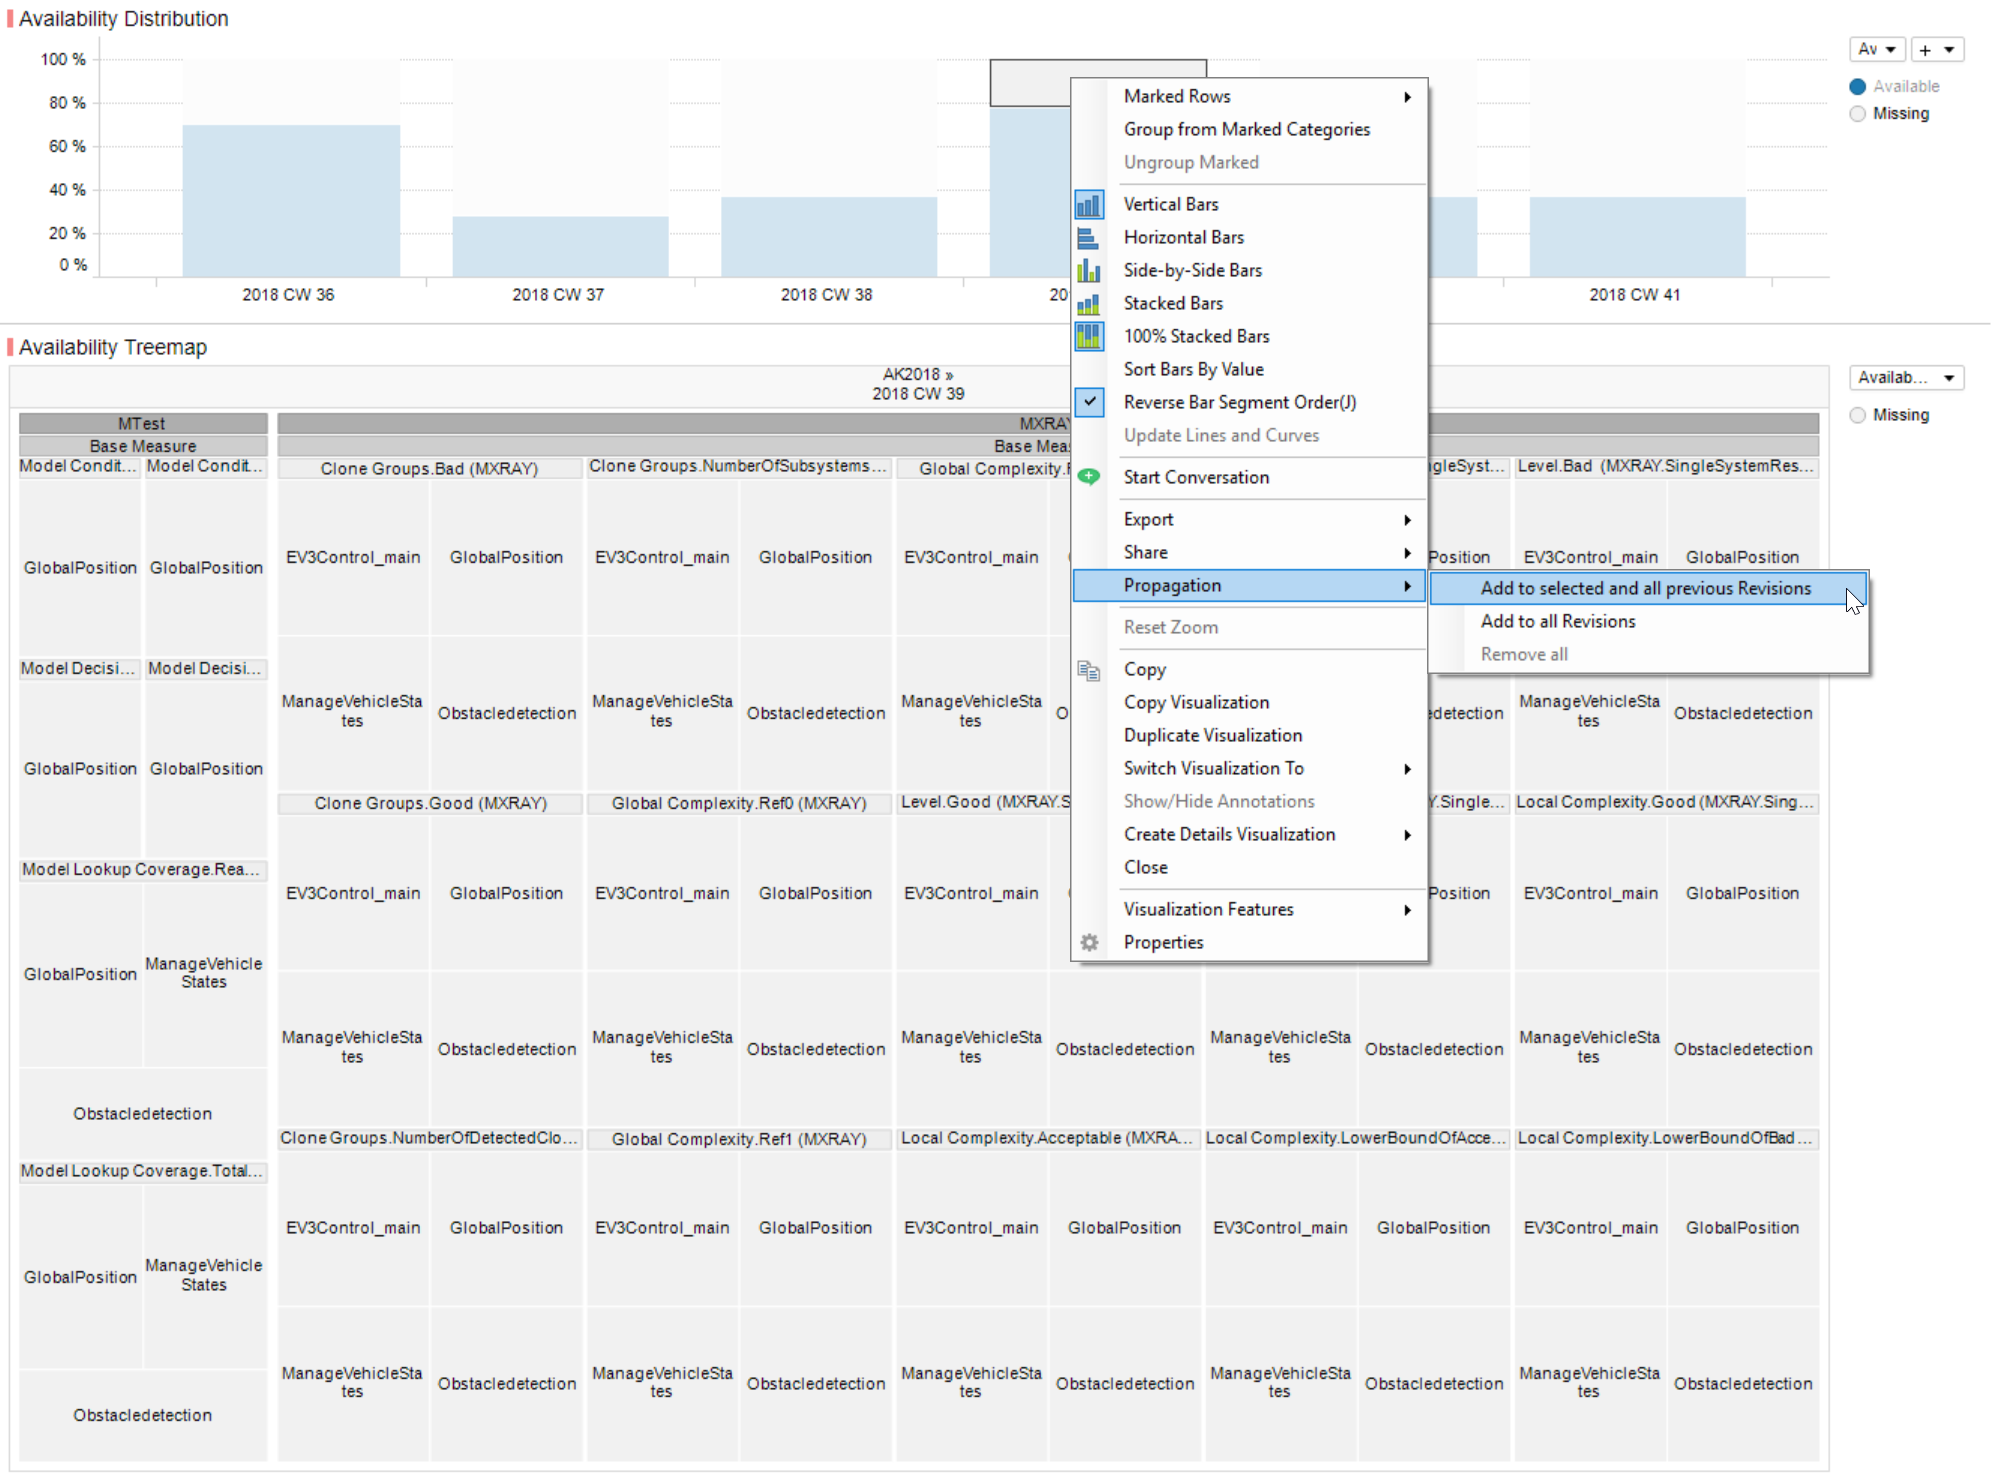
Figure 8.5 Select a particular Missing Data Bin in the Availability Distribution Bar Chart and choose Propagation to Selected Revision from Context Menu
Figure 8.6 shows propagated data (light blue data bins) until CW 39, but not afterwards. It is also to be seen, that the amount of data to be propagated was restricted just to those data missing in CW 39.
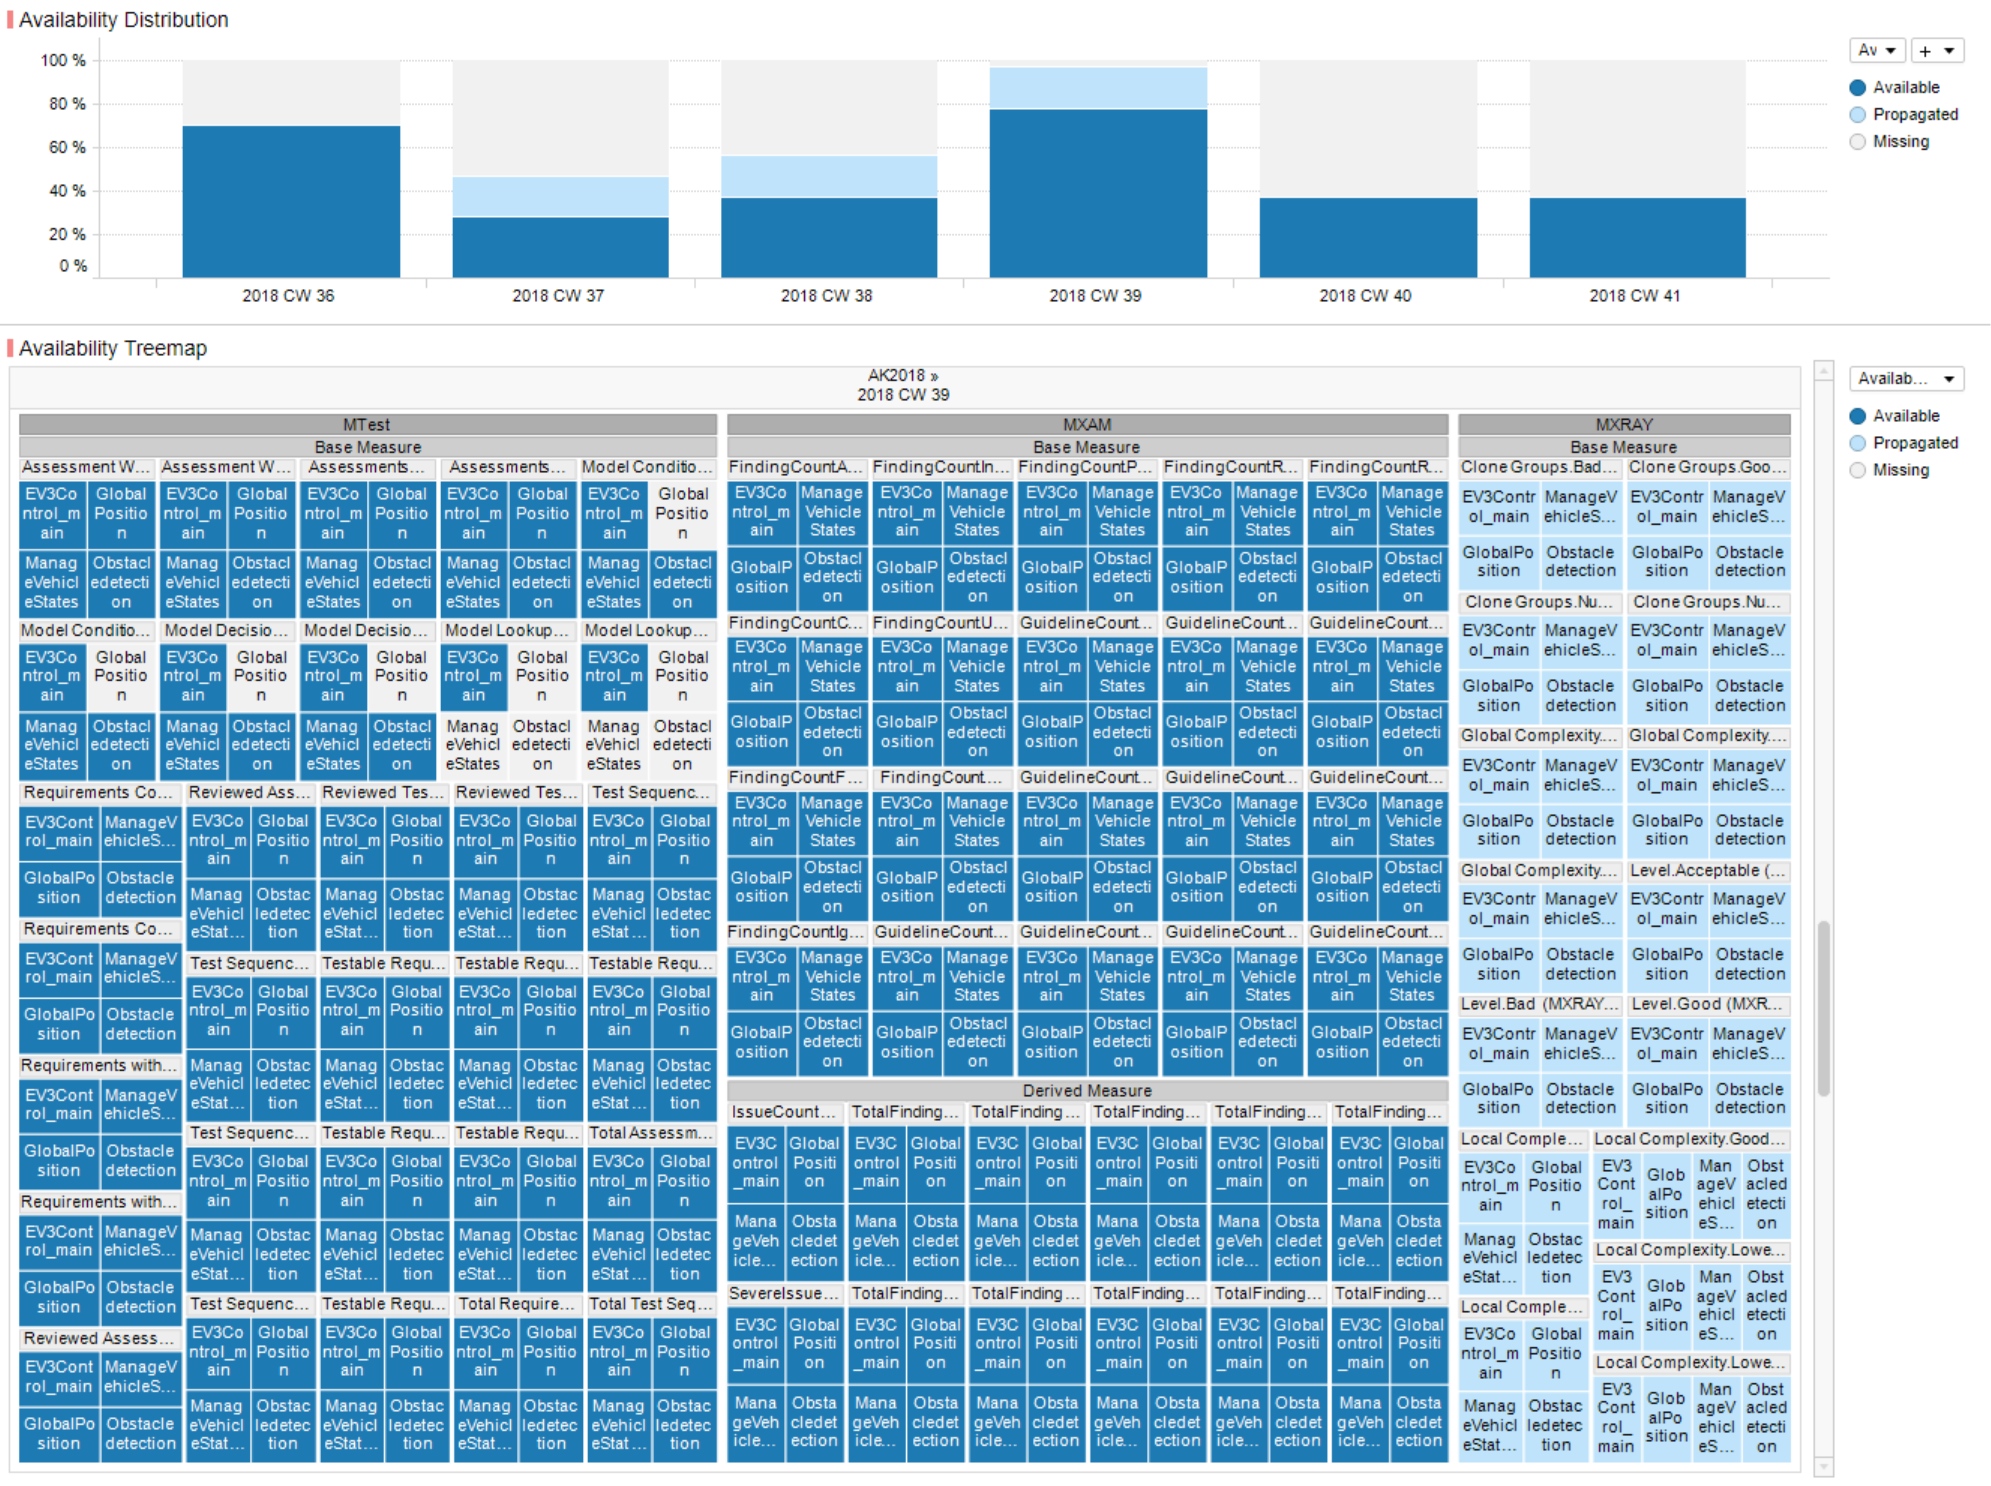
Figure 8.6 Data has been propagated until choosen revision
Note
If propagation was already triggered before - either for all revisions or for a selected revision later than the currently selected one - all previously propagated data, which matches the current selection, will be removed from the later revisions.
8.5. Propagate Data to all Revisions
Select data as described in Data Selection for Propagation, then right click on selection and choose .
This fills all revisions including the most recent one with propagated data even if the selection was done on another revision.
Additionally, if at a later point in time new data is loaded for additional revisions, data that is missing for these new revisions is propagated to these revisions, too.
8.6. Remove Propagated Data
Select data as described in Data Selection for Propagation, then right click on selection and choose .
This removes the propagated data (for the choosen selection) from all revisions.