7. Set up an MQC project
To work with MQC, a user has to set up an MQC project. There are two possible options to do that:
7.1. Create a project from scratch
To create a project from scratch after opening MQC, you have two options (see Figure 7.1).
Either open the dialog on the left-hand side (click on the
+in the top left corner) and chooseCreate new Project.Or use the
Create Projectoption within the section inside the main window of the MQC landing page (only available if MQC has been newly started).

Figure 7.1 Start creating a new MQC project via the entry in the left-hand side panel or via the menu entry in the section inside the main window
A dialog (Figure 7.2) opens asking for the location of your data (see Data Sources) and allows to change the revision granularity used (see Revisions).
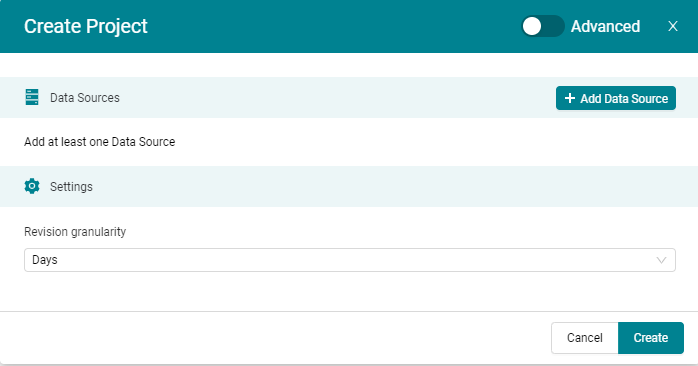
Figure 7.2 Create Project dialog (simple mode) to initially configure the data source(s) and to set the revision granularity
After confirming the dialog using the Create button, a new project is set
up with the data contained in your data source(s) and defaults for all
remaining settings (see Configuration).
Note
All default settings used for project creation may be changed later via the configuration panel (see Configuration).
In case you would like to adapt further settings, e.g. Switch on Propagation, add a quality model configuration (see Quality Model Configuration) or project structure (see Project Structures Configuration), you can switch to the advanced mode of the Create Project dialog as shown in Figure 7.3 by using the switch in the top-right corner.
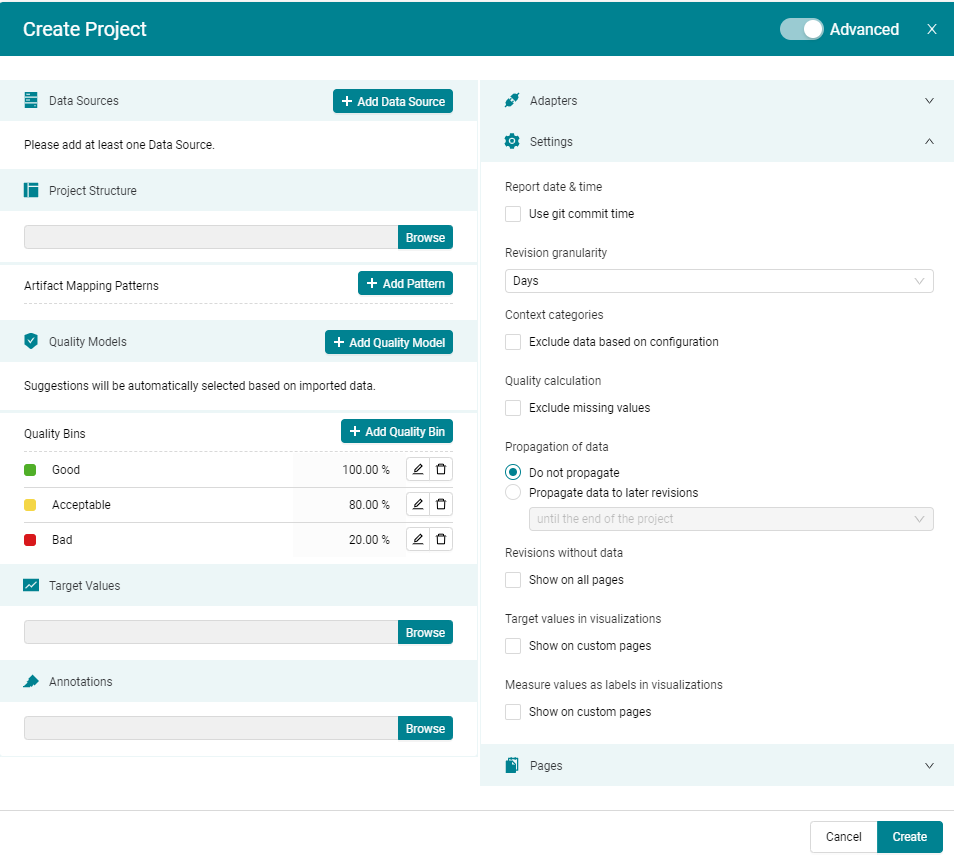
Figure 7.3 Create Project dialog (advanced mode) to import data source(s), quality model(s), project structure and to change the settings before creating a project.
The advanced mode of the Create Project dialog allows you to load all configuration files and to adapt all necessary settings from the Configuration menu to be already applied during project creation. This facilitates a fast and comprehensive setup process.
In case you switch back from advanced to simple mode, nevertheless all your previously made settings will be kept and applied when creating the project.
Note
If you confirm the dialog without selecting a data source, an empty project is created. This might be useful in case you don’t already have data for your project, but would like to do all necessary configurations in advance.
Data sources can be added at any later point in time (see Data Sources).
7.2. Create a project using a Setup Configuration
MQC provides the possibility of importing a setup configuration (see Import a setup configuration) to easily set up a project. This configuration can be created in two ways:
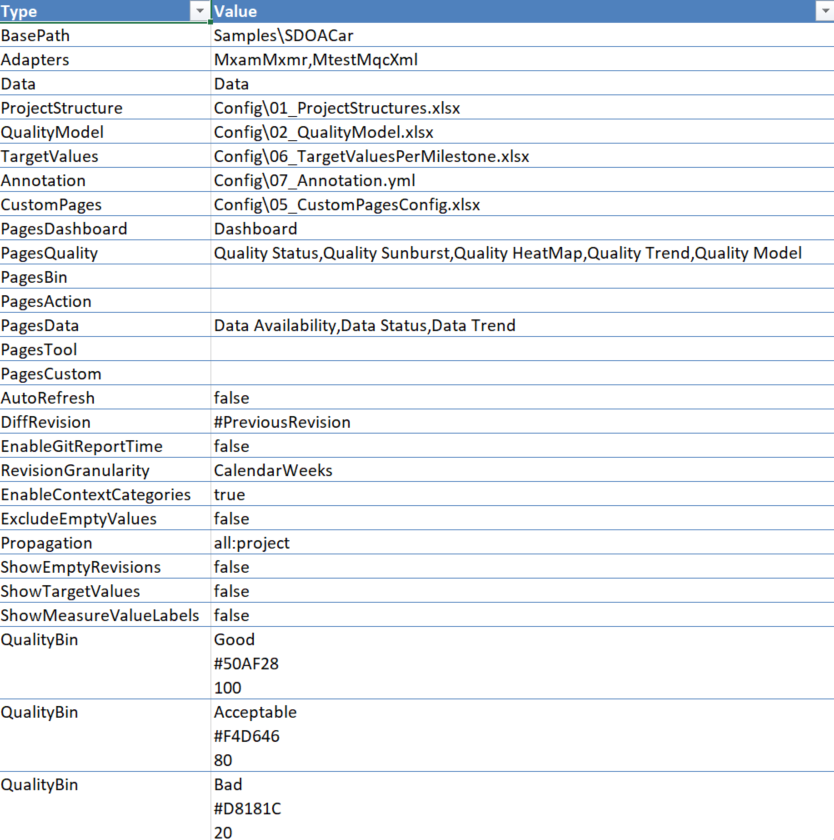
Figure 7.4 Sample of setup configuration file
7.2.1. Export a setup configuration from an existing project
In MQC you can export a setup configuration file, which contains all the settings done in the current project in order to use it as backup for a fast re-creation of the current project or to use it as a template for creating other similar projects.
Open the dialog via the configuration menu and select
the Setup Configuration button to export the current configuration as Setup
Configuration (see Figure 7.5).
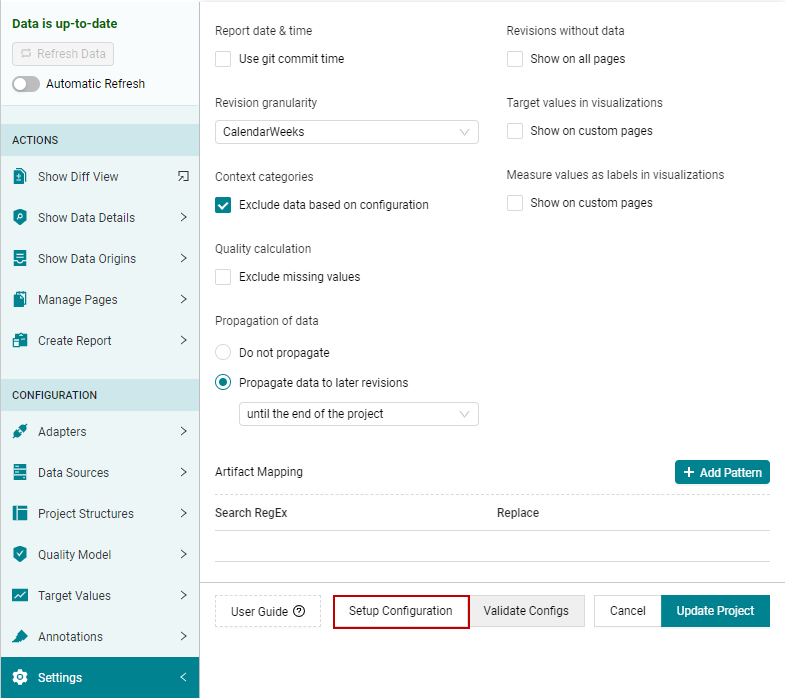
Figure 7.5 How to export Setup Configuration excel file for current project
7.2.2. Manually configure a setup configuration
For the setup configuration the user can define:
files and directories containing reports of tools/data sources to be imported into MQC
names and paths of MQC configuration files, e.g. project structure
as well as almost all options, e.g. revision granularity.
Note
All values described in the following may be left empty. MQC applies defaults for all values, which are not configured in the setup configuration.
Errors in the configuration will be ignored. In any case a project is created and the user gets a notification via a validation dialog after the load of the setup configuration has been finished.
As shown in Figure 7.4, each configuration entry
consists of a Type, which is fix, and a Value, which can be configured.
This configuration can be divided into three parts:
Set the paths of all files that can be imported in MQC. This contains:
Project structure configuration (see Project Structures Configuration)
Quality model configuration (see Quality Model Configuration)
FML file selection: If action derivation needs to be done using fuzzy rules, then the file path for the FML file must be added here (see Actions)
Target values configuration (see Target Values)
Annotations (see Import and Export of Annotations)
Custom pages configuration (see Custom Pages)
Git Repository configuration: Provide the url for the git repository to be used as a data source. For each repository to be configured, one row is added with type
GitRepositoryand the url as value. Additionally, authentication details may be given here if necessary (see Git Authentication)Git data source configuration: For each git data source a new row must be added with type
Dataand the respective configurations separated by a new line as value. The first line contains the url of the git repository. Next, the name of the branch of this repository to be used. This can be followed by multiple commit filters and file patterns required to narrow down the selection of files to be imported from this data source (see Figure 7.4 resp. Git (Beta)).Files and directories containing reports of tools/data sources: for each of the directories and single files to be imported, one row is added to the setup configuration via type
Dataand path of them as value.Custom adapters: for each custom adapter, a separate row should be added with
CustomAdapteras type and path of file as value. For more detailed information please see Developing a Custom Adapter.
Note
As Figure 7.4 shows, the first row of the setup configuration is for setting a . If all files are located under the same path, this can be defined once as and all other path values may be configured as relative paths.
Set default values for MQC options. This contains:
Automatic refresh: can be true or false (see Refresh Data)
Propagation: can be “None”, “All:Project” or “All:Milestone” (see Data Propagation)
Revision Granularity: can be “Months”, “CalendarWeeks” or “Days” (see Revision granularity)
Diff Revision: The comparison base to be used for Diff pages and visualizations (see Quality Diff and Availability Diff). Use one of the following options:
relative comparison base: “#PreviousRevision” or “#PreviousMilestone”
fixed comparison base: add a revision name as value, e.g. “2021-W41” (for the revision name notation see Revisions).
Git Report Date Time: can be true or false (see actions-and-configuration-menu-reportdatetime)
Show empty revisions: can be true or false (see Project Milestone Structure).
Enable context categories: can be true or false (see Configuration of Context Categories)
Enable annotations: can be true or false (see Annotations)
Show target values: can be true or false (see Target Values)
Show measure value labels: can be true or false (see Adapt Visualizations on Custom Pages)
Adapters: list of base adapters which should be enabled in MQC, all entries are separated by , if empty or not defined all base adapters are enabled. For more detailed information please see Custom Adapters.
ArtifactMappingPattern: there should be one excel row for each pattern (see Artifact Mapping) and in Value cell first line is Search RegEx and second line is Replace.
Quality bin configuration: for each quality bin, a separate row should be added with
QualityBinas Type and Name, Hex Color Code and Upper Quality Boundary each on new line as value (see Quality Model Configuration)
3. Set the pages, which should be shown in the analysis. For each row from a group of provided pages in MQC (e.g. PagesQuality and PagesData), chosen pages should be added and separated by . For more detailed information please see Manage Pages
7.2.3. Import a setup configuration
As shown in Figure 7.6, click on Open local file
within the dialog on the left hand side to
import a setup configuration file.

Figure 7.6 How to import Setup Configuration excel file for easy setup of MQC
Then navigate to the folder where you have stored a previously created setup configuration file, select the file and confirm the dialog.
Note
If you are using the web version of MQC, before importing a setup configuration you need to ensure that the setup configuration file is located on a network drive, which is mounted at and can be accessed by the server. The value within the configuration file should be set to the network path of the directory where your project data is located.